Blog on the edge with Hugo and AWS
Victor Hugo Montes
Welcome to the very first post of this blog! Today, I will show you how I created this blog with Hugo and how I hosted it on AWS. I will also show you how I deployed it with Github Actions.
I have been thinking about creating a blog for a long time. However, with everyday life and work, I never found the time to do it. While looking for interesting projects to contribute, I came across Hugo. I was impressed by its speed and ease of use. I decided to create a blog with Hugo and host it on AWS.
While thinking about the scope of this project, I realised that the challenge of creating a blog with Hugo and hosting it on AWS would be a great very first blog post. So here we are! Hopefully you will find this blog post useful and interesting.
Quick introduction to Hugo
First of all, we need to install Hugo. You can download the latest version for your platform from https://gohugo.io/installation/. Hugo is a very interesting tool. It is a static site generator written in Go. It is very fast and easy to use. It is also very flexible. You can use it to create a blog, a documentation site, a portfolio, etc. Hugo uses Markdown to create content. Markdown is a lightweight markup language that is very easy to learn. You can find more information about Markdown here.
Creating a new site
Now we can create a new site with the following command:
hugo new site myblog
Add a theme
Hugo has a lot of themes. You can find them on https://themes.gohugo.io/. I will use the Ananke theme for this blog. You can add the theme with the following command:
cd myblog
git init
git submodule add https://github.com/theNewDynamic/gohugo-theme-ananke.git themes/ananke # This is the theme I am using in this blog
Add content
Now we can add some content to our blog. We can do this with the following command:
hugo new posts/creating-blog-hugo.md
This will create a new file in the content/posts directory. You can edit this file with your favorite editor. I usually use Visual Studio Code for editing Markdown files as it has a lot of useful extensions for Markdown. You can find more information about Markdown extensions for Visual Studio Code here.
Run the server
Now we can run the server with the following command:
hugo server -D
This will start a server on port 1313. You can open your browser and go to http://localhost:1313/ to see your blog.
Publish your blog
Now we can publish our blog with the following command:
hugo
This will create a public directory with all the files needed to publish your blog. You can use any web server to serve your blog. I used AWS S3 to host my blog with Cloudfront. I will explain how to do this in the next section.
Architecture of this blog
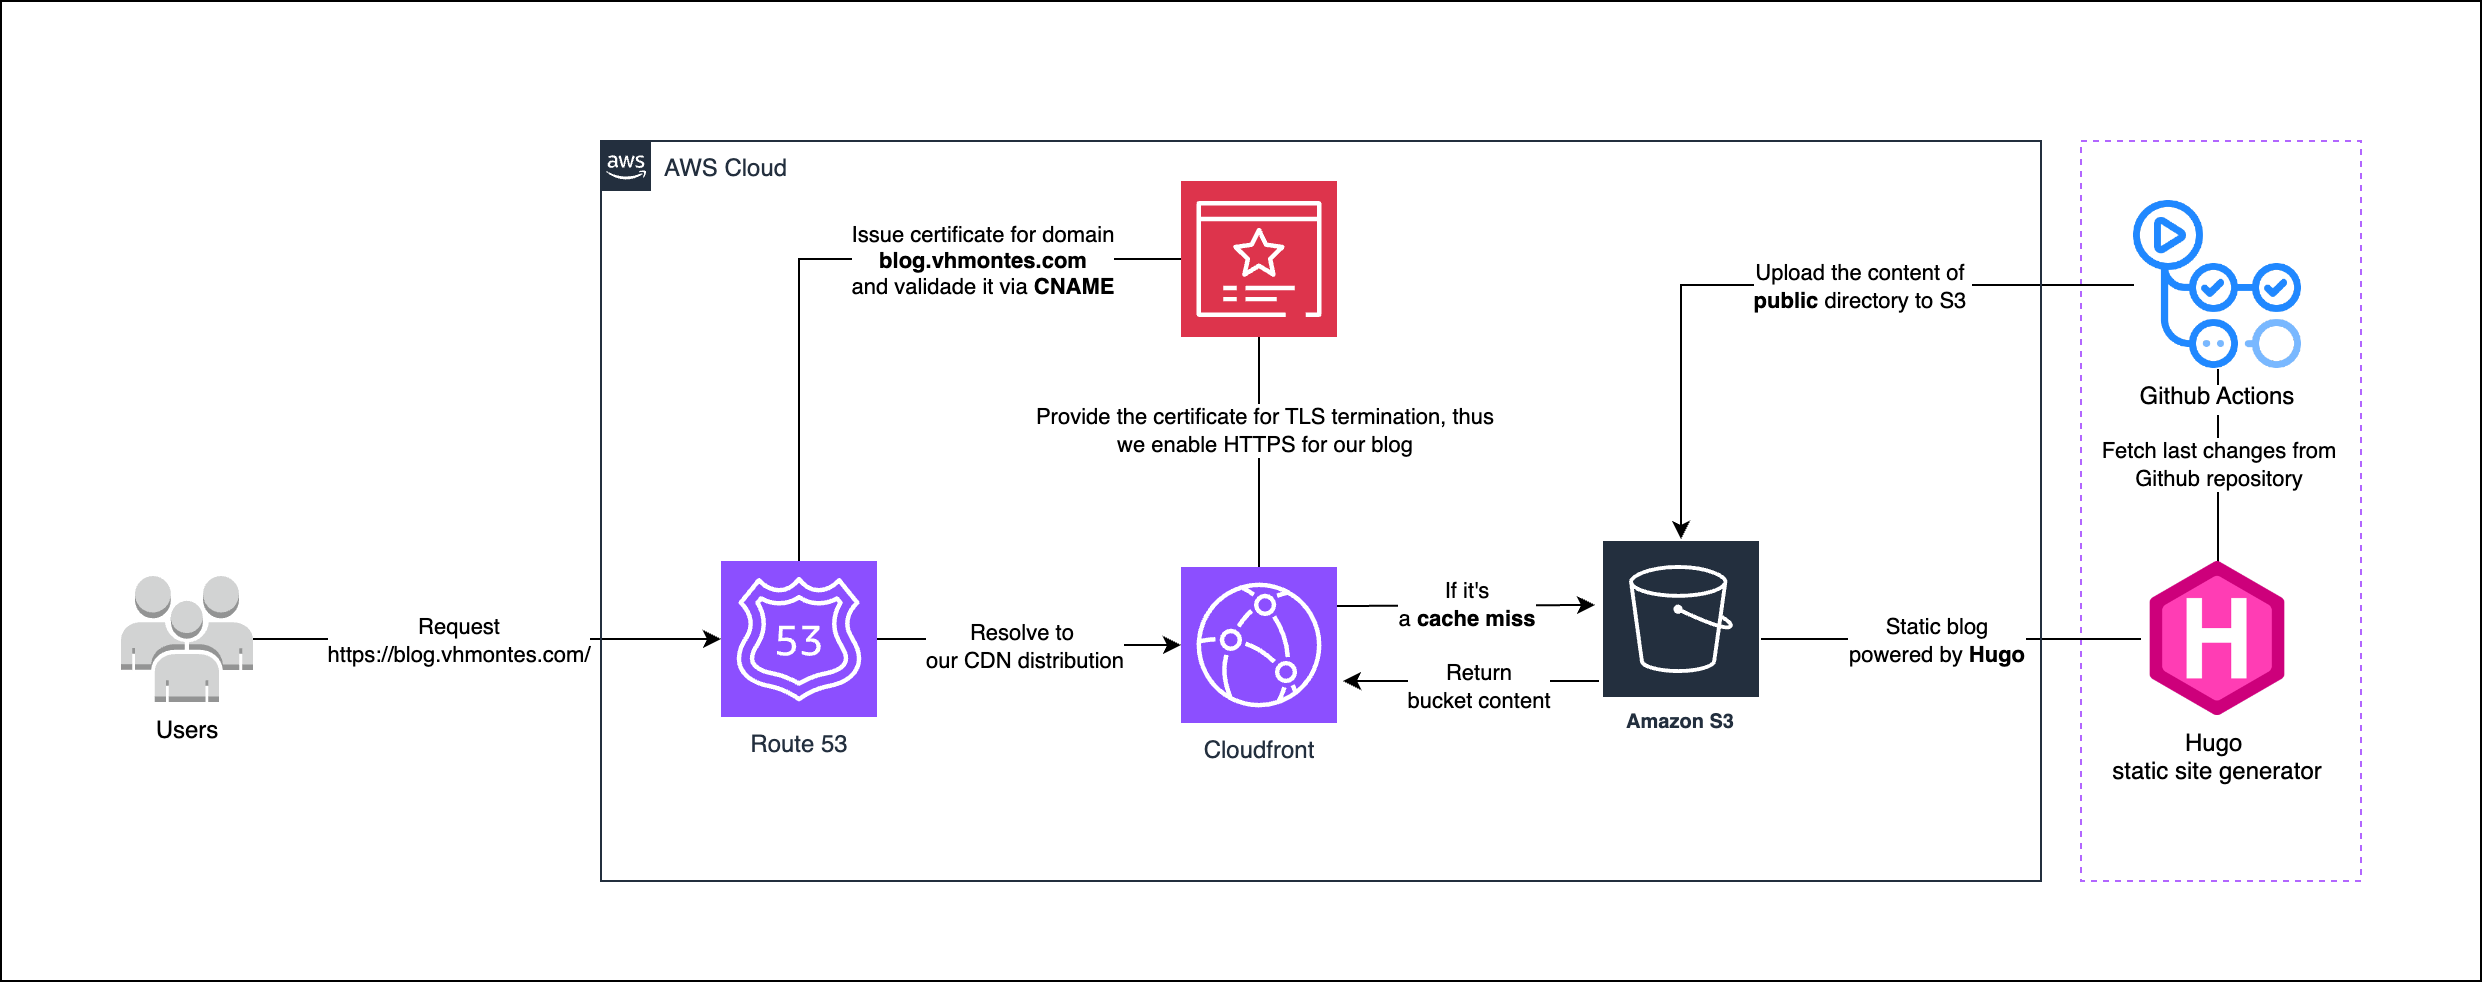
The architecture of this blog is mainly based on CloudFront and S3 as origin. I use Route 53 to manage domain name resolution and Certificate Manager to manage SSL/TLS certificates, so that I can enable HTTPS for this blog. In a nutshell, the architecture looks like this:

Flow of a request:
- A user requests a page from our blog.
- Route 53 resolves the domain name to the CloudFront distribution.
- CloudFront checks if the requested page is in the cache.
- If the page is in the cache, CloudFront returns the page to the user.
- If the page is not in the cache, CloudFront requests the page from the origin, in our case S3.
- S3 returns the public content of Hugo to CloudFront.
- CloudFront caches the page and returns it to the user.
- The user receives the page and renders it in the browser.
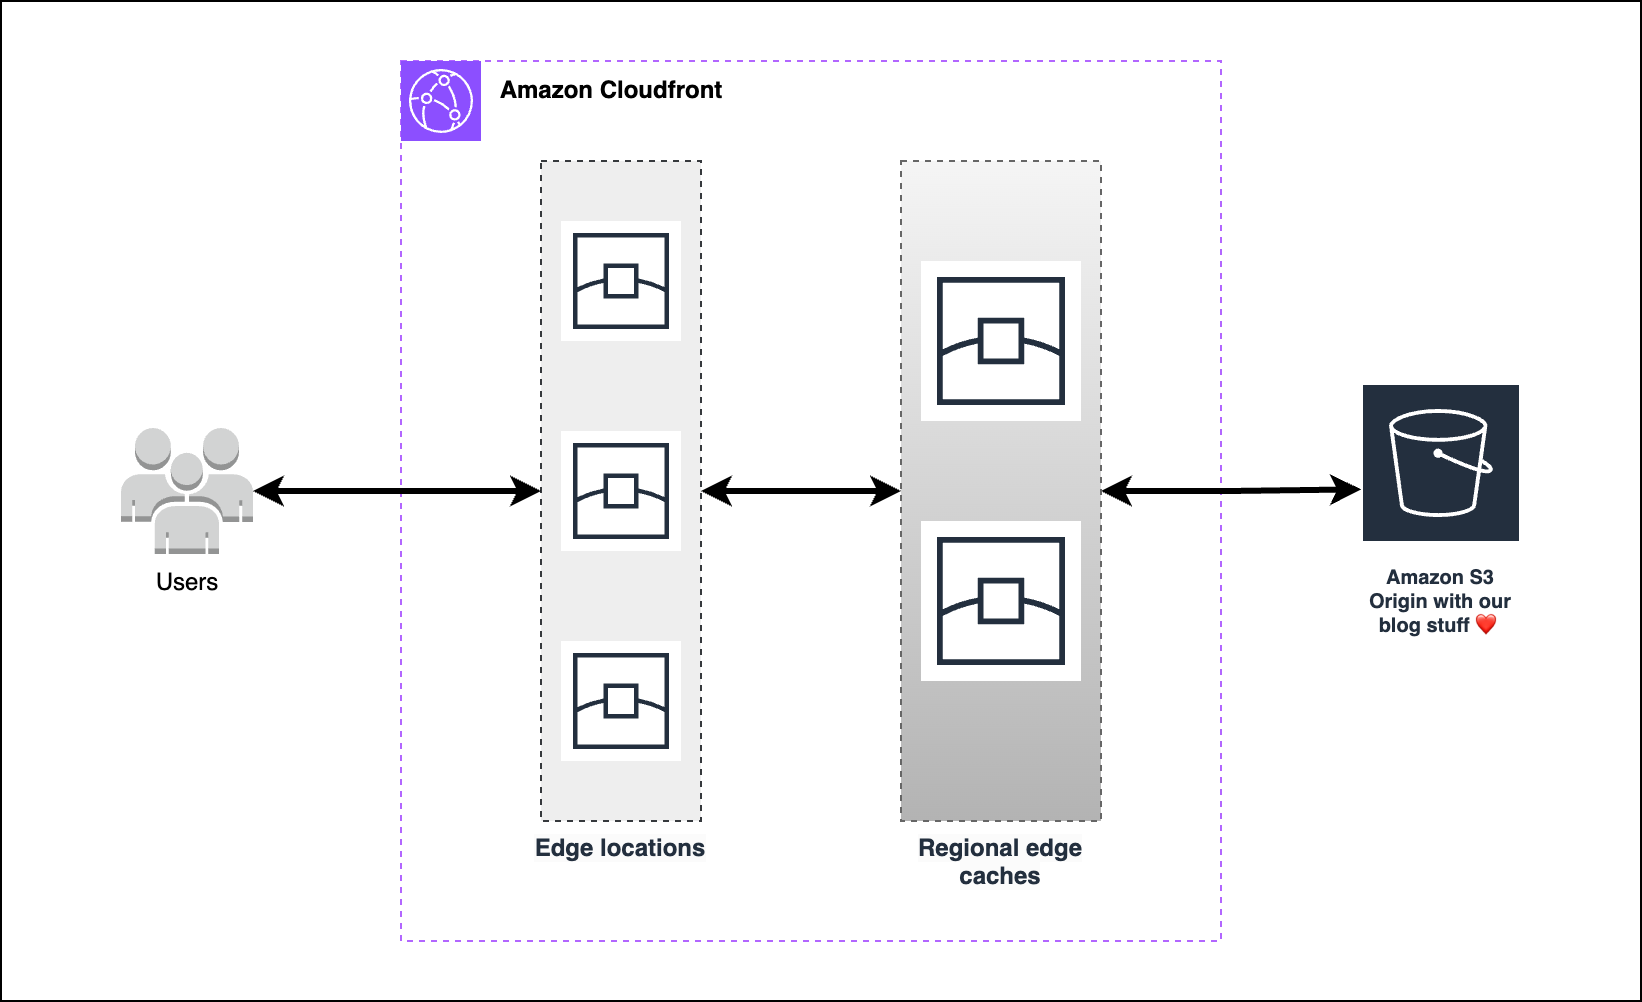
CloudFront plays a very important role in this architecture. It is a content delivery network (CDN) that delivers content to end users with low latency and high transfer speeds. CloudFront is a global network of edge locations and regional edge caches. Edge locations are located in major cities around the world. Regional edge caches are located in major cities within a region. What does this mean? It means that CloudFront caches the content of this blog in edge locations and regional edge caches, and serve it to end users with low latency and high transfer speeds.
The diagram below shows the CloudFront layers that a request goes through before reaching the origin.

How can I check if this blog is being served from the cache?
You can use the X-Cache header to know your request is being served from the cache. The X-Cache header has the following values:
- X-Cache: Miss - The object was not in the cache.
- X-Cache: Hit - The object was in the cache.
- X-Cache: RefreshHit - The object was in the cache but it was stale. CloudFront refreshed the object in the background and served the stale object to the user.
Here is an example of a request to this blog from Barcelona:
curl -I https://blog.vhmontes.com

HTTP/2 200
content-type: text/html
content-length: 16205
date: Wed, 06 Dec 2023 18:08:05 GMT
last-modified: Wed, 06 Dec 2023 00:17:23 GMT
etag: "4dae95bf86de224c88c6ffe7bb81382a"
x-amz-server-side-encryption: AES256
accept-ranges: bytes
server: AmazonS3
x-cache: Miss from cloudfront
via: 1.1 4e5c89c628753e37c176aa73e17a6e2c.cloudfront.net (CloudFront)
x-amz-cf-pop: MAD51-C1
x-amz-cf-id: oeEcJZM6R9ncr_wfOQAOP-0vAscf6DIjSvkuSIk8IBmDEzziUz6hcQ==
As you can see, the x-cache header has the value Miss from cloudfront. This means that the object was not in the cache and CloudFront had to request it from the origin. Also, another interesting header is the x-amz-cf-pop header. This header is indicates that the request was served from an point of presence (POP) in Madrid.
I am located in Barcelona, so this is a good sign. If I had set up my blog to be served straight from S3, the round trip time would be much higher, therefore increasing the latency of my blog.
Now let’s wrap up everything in terraform
I am not a big fan of ClickOps, so because of that, I prefer to make things repeatable and scalable as it should always be. For this, I have used terraform to create my infrastructure.
The terraform code for this blog is available on infra folder. For your (and mine) convenience I’ve created a Makefile to help you with the terraform commands.
I wish I could have made this process a one single command, but unfortunately it is was not possible. So before we jump to some terraform plan and apply commands, we need to do some manual steps.
Manual steps
Create a S3 bucket to store our terraform state
First of all, we need to create a S3 bucket to store our terraform state. We will use the following command:
aws s3api create-bucket --bucket {BUCKET_NAME}-terraform-state --region {BUCKET_REGION}
Replace {BUCKET_NAME} with the name of your bucket and {BUCKET_REGION} with the region of your bucket.
Buy a domain name via Amazon Route 53
Now we need to buy a domain name for the blog, we can use AWS Route 53 for this. From AWS Route 53 you can buy a domain name either via the AWS console or via the AWS CLI. I found it easier to do it via the AWS console. You can find more information about this process here. Once you have bought your domain name, you will see that AWS has created a hosted zone for you automatically. That’s the one our terraform code will use.
Terraform apply it!
Before we run the commands to create our infrastructure, check the terraform.tfvars file and replace the values with your own. There you will find the following variables:
domain_name                 = "vhmontes.com" #Your own domain name
subdomain_name              = "blog" # It will be prepended to the domain name e.g. blog.vhmontes.com
aws_region                  = "us-east-1" # Region of your bucket
default_root_object         = "index.html" # Default root object for your S3 bucket.
bucket_name                 = "victoraldirblogbucket" # Bucket that will store your blog content
terraform_state_bucket_name = "blogvictoraldir-terraform-state" # Place the one you created via AWS CLI
terraform_state_bucket_key  = "blog/terraform.tfstate" # The key where the terraform state will be stored
aws_account_id              = 123456789012 # Your AWS account ID
Now we can run the following command to create our infrastructure:
make deploy-infra
This will create the following resources:
- S3 bucket to store our blog content.
- CloudFront distribution to serve our blog with S3 as origin.
- Set up OAC (Origin Access Control) to restrict access to our S3 bucket.
- Fetch the Route 53 hosted zone ID based on the domain name.
- Create a Route 53 record to point to our CloudFront distribution.
- Create a certificate for our subdomain + domain name via AWS Certificate Manager.
- Validate the certificate via DNS validation.
That’s a lot of resources, right? Imagine having to create all of them manually. That’s why I love terraform. It makes our lives easier.
Github Actions to deploy our blog
Deploying our blog straight from our laptop is not a good idea. We need to automate this process. For this, we will use Github Actions. Github Actions is a CI/CD tool that allows us to automate our workflows. The workflow used to deploy our blog is available here.
There are two workflows:
cd-blog.yml - This workflow is triggered when a new commit is pushed to the main branch or when a pull request is created. It will run the following steps:
- Checkout the code.
- Setup Hugo
- Build the blog.
- Deploy the blog to S3. (only if the push is to the main branch)
cd-infra.yml - This workflow is triggered when a new commit is pushed to the infra branch or when a pull request is created. It will run the following steps:
- Checkout the code.
- Setup Terraform.
- Check formatting.
- Init terraform.
- Validate terraform.
- Plan terraform.
- Apply terraform. (only if the push is to the main branch)
Configuring Repository secrets
In order to deploy our blog, we need to configure some secrets in our repository. These secrets are:
- AWS_ACCESS_KEY_ID - AWS access key ID.
- AWS_SECRET_ACCESS_KEY - AWS secret access key.
- AWS_DEFAULT_REGION - AWS region.
You can find more information about how to configure repository secrets here.
The configuration should look like this:

Github repository with the blog
The repository with the blog is available here. Feel free to fork it and use it as a template for your own blog.
Conclusion
In this blog post we have seen how to create a blog with Hugo and how to host it on AWS. We have also seen how to deploy our blog with Github Actions. I hope you have found this blog post useful and interesting. If you have any questions or comments, please leave them in the comments section below. I will be happy to answer them.